|
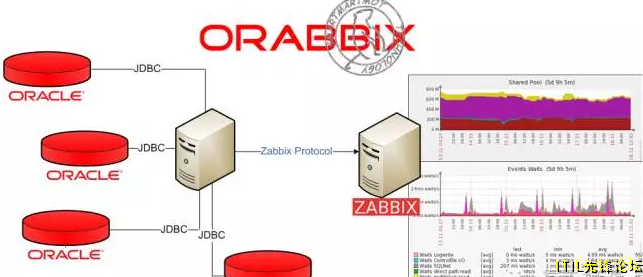
一 Orabbix介绍 监控Oracle数据库我们需要安装第三方提供的Zabbix插件,我们先测试比较有名的Orabbix,[url=]product/orabbix/[/url]

从部署架构图上可以看出,orabbix是通过JDBC去连接被监控数据库的,其实不是必须在数据库主机上安装Agent,而运行orabbix的主机,可以是Zabbix Server,也可以是数据库主机和zabbix server之外的任意一台主机,为了测试方便,我们将orabbix安装在Zabbix Server上。
二 下载软件及安装服务
1)复制启动脚本 #cp /opt/orabbix/init.d/orabbix /etc/init.d/orabbix 2)运行权限: #chmod +x /etc/init.d/orabbix #chmod +x /opt/orabbix/run.sh 3)#chkconfig --add orabbix
三 建立监控用户及授权CREATE USER ZABBIX IDENTIFIED BY welcome1 DEFAULT TABLESPACE SYSTEM TEMPORARY TABLESPACE TEMP PROFILE DEFAULT ACCOUNT UNLOCK; REM 2 Roles for ZABBIX GRANT CONNECT TO ZABBIX; GRANT RESOURCE TO ZABBIX;
ALTER USER ZABBIX DEFAULT ROLE ALL; REM 5 System Privileges for ZABBIX GRANT SELECT ANY TABLE TO ZABBIX; GRANT CREATE SESSION TO ZABBIX; GRANT SELECT ANY DICTIONARY TO ZABBIX; GRANT UNLIMITED TABLESPACE TO ZABBIX; GRANT SELECT ANY DICTIONARY TO ZABBIX;
如果是11g数据库,执行下列语句: exec dbms_network_acl_admin.create_acl(acl => 'resolve.xml',description => 'resolve acl', principal =>'ZABBIX', is_grant => true, privilege => 'resolve'); exec dbms_network_acl_admin.assign_acl(acl => 'resolve.xml', host =>'*'); commit;
四 修改orabbix配置文件#cd /opt/orabbix/conf #cp config.props.sample config.props
根据实际的部署情况修改文件,比如: #comma separed list of Zabbix servers ZabbixServerList=ZabbixServer1 ZabbixServer1.Address=192.168.0.41 ##Zabbix服务器地址 ZabbixServer1.Port=10051 ##Zabbix服务器端口 #pidFile OrabbixDaemon.PidFile=./logs/orabbix.pid #frequency of item's refresh OrabbixDaemon.Sleep=300 #MaxThreadNumber should be >= than the number of your databases OrabbixDaemon.MaxThreadNumber=100 #put here your databases in a comma separated list DatabaseList=DB1,DB2,DB3 ##数据库列表,名称随便起 #Configuration of Connection pool #if not specified Orabbis is going to use default values (hardcoded) #Maximum number of active connection inside pool DatabaseList.MaxActive=10 #The maximum number of milliseconds that the pool will wait #(when there are no available connections) for a connection to be returned #before throwing an exception, or <= 0 to wait indefinitely. DatabaseList.MaxWait=100 DatabaseList.MaxIdle=1 #define here your connection string for each database DB1.Url=jdbc:oracle:thin:@192.168.0.31:1521:test1 ##数据库连接串 DB1.User=zabbix ##监控数据库用户名 DB1.Password=welcome1 ##监控数据库口令
保存配置文件,然后重启orabbix。
五 导入模板 在orabbix的软件包里面有4个模板文件,导入下面图中这个模板文件就可以了,包含了其他所有模板文件的内容。

六 适用Orabbix 在zabbix界面上配置数据库监控时,要注意,orabbix是把每个数据库都配置成一个“主机”的,这块看着有点别扭,而且,注意在配置主机时,名称一定要和config.props文件中配置的数据库名称一样,比如我这里就是DB1: 前面说了,这个“主机”的地址可以随便写,因为被监控的主机端不需要一定有agent,但是为了方便管理,我觉得还是写上Oracle主机的地址比较好。
定义了主机后,就可以使用模板中预定义的监控项、触发器和图表了。 比如图表: 比如最简单的检查数据库适用可用的触发器: 当然,对应触发器的动作还是需要自己配置。
七 自定义SQL检查Orabbix提供了表空间的监控,监控项对应的SQL: tbl_space.Query=SELECT * FROM ( \ select '- Tablespace ->',t.tablespace_name ktablespace, \ '- Type->',substr(t.contents, 1, 1) tipo, \ '- Used(MB)->',trunc((d.tbs_size-nvl(s.free_space, 0))/1024/1024) ktbs_em_uso, \ '- ActualSize(MB)->',trunc(d.tbs_size/1024/1024) ktbs_size, \ '- MaxSize(MB)->',trunc(d.tbs_maxsize/1024/1024) ktbs_maxsize, \ '- FreeSpace(MB)->',trunc(nvl(s.free_space, 0)/1024/1024) kfree_space, \ '- Space->',trunc((d.tbs_maxsize - d.tbs_size + nvl(s.free_space, 0))/1024/1024) kspace, \ '- Perc->',decode(d.tbs_maxsize, 0, 0, trunc((d.tbs_size-nvl(s.free_space, 0))*100/d.tbs_maxsize)) kperc \ from \ ( select SUM(bytes) tbs_size, \ SUM(decode(sign(maxbytes - bytes), -1, bytes, maxbytes)) tbs_maxsize, tablespace_name tablespace \ from ( select nvl(bytes, 0) bytes, nvl(maxbytes, 0) maxbytes, tablespace_name \ from dba_data_files \ union all \ select nvl(bytes, 0) bytes, nvl(maxbytes, 0) maxbytes, tablespace_name \ from dba_temp_files \ ) \ group by tablespace_name \ ) d, \ ( select SUM(bytes) free_space, \ tablespace_name tablespace \ from dba_free_space \ group by tablespace_name \ ) s, \ dba_tablespaces t \ where t.tablespace_name = d.tablespace(+) and \ t.tablespace_name = s.tablespace(+) \ order by 8) \ where kperc > 93 \ and tipo <>'T' \ and tipo <>'U' tbl_space.NoDataFound=none
这个SQL会返回93%满的表空间信息,而对应这个监控项,orabbix也定义了触发器,因为监控项的返回值是文本,而没有满足条件的记录是返回字符串“none“,所以监控项对应的触发器会检查返回值开头是不是none,如果不是,就报警,这样,用户除了收到预警信息,还能从返回值的具体值中看到具体是哪个表空间快满了。
当然,大部分时间监控项会返回none,所以我们无法画出正常未满的表空间的空间占用时间曲线。只有超过93%满时,我们才知道具体的占用情况。 如果想收集并保留更多信息,就需要使用自定义查询,方法就是在query.props文件中加入你想检查的SQL,比如我们想了解表空间信息,就加以下SQL: customtbl.Query=select 'TBL:'||a.tablespace_name||',' TBL, \ 'Total Size:'||trunc(sum(a.tots) / 1024 / 1024, 2)||',' Tot_Size_mb, \ 'Free MB:'||round(sum(a.sumb) / 1024 / 1024, 2)||',' Tot_Free_mb, \ 'PCT Free:'||round(sum(a.sumb) * 100 / sum(a.tots), 2)||',' Pct_Free, \ 'Max Free MB:'||round(sum(a.largest) / 1024 / 1024, 2)||',' Max_Free_mb, \ 'Chunks Free:'||sum(a.chunks)||',' Chunks_Free \ from (select tablespace_name, \ 0 tots, \ sum(bytes) sumb, \ max(bytes) largest, \ count(*) chunks \ from dba_free_space a \ group by tablespace_name \ union \ select tablespace_name, sum(bytes) tots, 0, 0, 0 \ from dba_data_files \ group by tablespace_name) a \ group by a.tablespace_name customtbl.NoDataFound=none
然后在orabbix对应的模板中添加这个监控项customtbl就可以了,下面是从最新数据菜单查看的SQL的返回结果: 当然,我们要做进一步的分析和展示,就需要使用别的工具或者开发工具来做了,这个就不是这篇文章讨论的范围了。
八 Orabbix不足初步测试,感觉orabbix有2点明显缺陷: 1. 被监控数据库信息要逐个写进配置文件,如果数据库个数比较多,管理会比较麻烦 2. 被监控数据库的账号信息是写在配置文件中,而且口令是明文存储,有很大的安全隐患 3. 对RAC的支持还是很初级 原创:海天起点
|